Showing posts with label copper. Show all posts

Tuesday, February 8, 2011

Still working towards selling on Etsy....


This has been my ongoing project for, oh, 2+ years - to actually list some things to sell in my Etsy online shop.  Looks like I may be a little late to take advantage of Valentine's Day gift shopping (oops! second year in a row!), but hearts aren't only for V-day?!


Today I worked on mastering the art of the adjustable knotted cord necklace.  That's what I've decided upon for for turning my pendants into necklaces to sell.  I think I worked out a length that adjusts from choker length (16"-ish) to approximately 32".  I'm using a faux-leather cord - 


I found the most helpful tutorial with excellent photographs of the steps here - http://www.ejrbeads.co.uk/adjustable%20page%201.htm


I read somewhere that the best lighting for taking photos of your items is daylight on a bright, cloudy day.  Here are a few photos taken in the sun the other day - 


I like the shadows myself.  I'll experiment with more photos on the next "bright, cloudy day"....


Thursday, April 23, 2009

Spring Wind Chime Redux


This is obviously very similar to the wind chime that I featured in my last post, but with one little change that I loved.  Instead of grabbing one of the heart pendants that I had lying around the studio to hang at the bottom, I made a little flower pendant in clear glass to match the main body of the piece.  The little flower is quite cute, and it is another potential jewelry item to market.  The fact that it matches the main part of the piece in both image and clear-ness was a detail I was very happy that I tried.  Here is a goofy shot, but it makes it obvious which parts are all clear glass -


This project was a donation to the fund raising auction for The Attic Learning Community.  


And speaking of goofy pictures, here is last minute one of an idea that popped into my head for still another pendant idea to work on....


I'll be working on the size and/or proportions of the recycling symbol, but I think that would be a good necklace pendant AND an especially a fun thing to potentially hang on my recycled-plastic-bag bags as a cool little token to emphasize that they are made of recycled materials.

Friday, March 27, 2009

Working on Glass Wind Chimes


I was asked recently if I would be willing to donate items to a couple of fund raising auctions.  I am a sucker for making stuff for a good cause.  Plus, having a concrete reason to create something (and having a deadline!) gets me working in the studio.  For each auction I decided to make a fused-glass wind chime and a knitted bag of some sort.  I'm posting pictures of my work so far on these two wind chimes to show-and-tell how I make them...


This is my beloved kiln, by the way.  I bought it from the man who owned the jewelry studio where I worked before Nick was born.  I spent HOURS making beads in it for the jewelry studio.  I just realized this week that it might be 30 years old, but I'll have to check with my buddy Carolyn, who was the studio manager and worked there way before me.  Nowadays you can buy kilns to use to fuse glass that are totally programmable.  Luckily I'm an old school kind of gal.  


For these two pieces I decided to make flower shapes out of copper wire and fuse them between clear glass for the body of the pieces.  For the hanging/chiming parts I planned on scavenging spring-ish colors from the miscellaneous glass that I have.  


My layout plan:


This is a shelf full of finished hanging parts for two wind chimes.  I fused a strip of clear glass on top of the strips of colored glass and included copper-wire rings at the top for hanging.  This picture shows you the size limitation that I have to work with in the kiln... the kiln shelf that I use is about 8"x9" - 


I divided up the parts  for the two pieces - 


While the hanging parts were in the kiln I figured out the layout of the flowers and the ring placement for the main part...


Ready to go in the kiln...


And the body of the piece after fusing in the kiln -  


I had to take a picture when I saw the late afternoon sun shining on it.  This is a good shot of the kiln paper that I use to keep the glass from sticking to the shelf.  The paper basically turns to powder after being in the kiln.  Nasty-for-your-lungs powder.  Maybe someday I'll try kiln wash on the shelf instead, but for now I'm careful not to breath this stuff.


This final shot shows the clear glass better than the first picture.  I decided that I wanted to hang an additional something from the bottom of one of the hanging parts , so I used a heart pendant that I already had.  For the second wind chime I will fuse a little copper wire flower in clear glass to use instead....


Sunday, February 8, 2009

Flattened Insulin Vial Wind Chime


I finally put together a wind chime using all of my slumped-until-they're-flat insulin bottles.  I was disappointed that the glass ended up being so cloudy, but I heated the heck out of them, so I guess that's an unfortunate side effect.  The spirals at the end of the copper wire are sandwiched between the layers of glass.  That was the inspiration for this project - fusing a wire inside the flattened vials so that they could then hang from that internal wire. 


I tried recording a couple short videos to show the nice clinking sounds that these little bottles make when they knock against each other, but unfortunately the sound didn't come through well at all.  


I just love these flattened little bottles.  They are just over 2 inches long when flattened.  Hmmm...I just realized that they are kind of the shape of an old-fashioned hot water bottle.   

Luckily when the bottles aren't slumped so extremely they seem to stay clear.  Stay tuned for one more slumping project with these babies that I'm still playing around with.  And I have an idea involving LED lights, but that's a whole new direction for the future.

Monday, February 2, 2009

Plagued by Air Bubbles

Thinking I had this air bubble situation, or apparent lack of a situation,  figured out, I did a batch of heart pendants last night without frit in the middle of the hearts.  Arrgghhh!  Bubbles galore, and larger ones this time, which is what I expected in the first place.  I think it was a fluke that my "control" in the first batch didn't have a bubble trapped in the middle of the heart.  So back to the frit idea tomorrow.  These pictures seem to be darker when I upload them, but you can still see what I'm talking about....


My favorite is this one.  I did it on a whim using clear glass for both the top and bottom layers.  It kind of looks like a heart frozen in ice: 


Anyway, enough whining about these pendants.  So far I have been hanging pendants on a black vinyl/fake leather look cord with silver latch findings that you slip onto the ends of the cord and pinch tight.  But I might also look into that metal bead cord, too.  I've been obsessed with that stuff since I was little and my grandma's bathtub plug was attached to the tub with a length of it.

Saturday, January 31, 2009

Working on Glass and Copper Pendants for Etsy...

I was JUST telling a class of 4/5th graders that art can be all about problem solving, and I think I jinxed myself!  Luckily not in a major way.  But this is an example of why I added the Whimsy LABS to my blog name!  

A friend has been encouraging me for a long time to make a fused-glass pendant with a heart shape crocheted out of copper wire, along the lines of the flower that I have done in the past.  For me the heart shape isn't a shape that I think of crocheting like the flower was, but I'm willing to try it.  Meanwhile, I had the idea to simply make a heart shape out of copper wire and pound it flat a bit before fusing it, like this:


The ring for hanging and the heart are made of the same guage of wire.  How handy that we lucked into inheriting a modest-sized anvil that I can bang on!


I know from previous -ahem - experience that little air bubbles can get trapped inside of shapes that are fused in glass, so I decided to try to eliminate that possiblity in the little hearts by sprinkling some clear frit (finely ground glass) into the center of the hearts to fill the space.  You can see it on the darker pieces in this picture taken before I put them in the kiln:


As it turned out, the one "control" piece without frit inside the shape didn't have any bubbles, and the ones WITH the frit all had tiny bubbles to some degree!  Oops.  (This picture is really bad - the light was fading outside by the time the batch was cooled down enough to remove from the kiln.)  


Here's a close-up of a few (the piece on the right is my "control"):


They are basically OK, but I know they could be better....so I'll do another bunch today.   I did crochet one heart shape, so I'll keep working on that idea, too.


Monday, December 15, 2008

If only I didn't need to sleep....I'd get so much more done!


At this time a couple of weeks ago I was super-busy fusing glass stars as fast as I could for a couple of selling opportunities.  Now I've been switching gears.  I needed to get a sewing job done super fast.  That's done.  Now I'm working on some Christmas gift projects.  


Here's a fused glass copper flame piece before it goes in the kiln...


.....and after.

The copper usually changes to a nice red after going through the heating/fusing process, but these larger pieces of copper obviously don't get hot enough in the center to oxidize or whatever.  I 've come to like that look, especially for a flame.


Here are a couple of recycled plastic bags that I have been working on for a friend - 


I stuck to cool colors for this one, and warm colors for the second, which, as you can see, I am still working on - 


It won't be much longer before it is done.

I am quite excited that I just recently sold three bags to a woman who won/bought the bag that I donated to my dad's Lion's Club auction last spring.  Pretty cool to get some follow-up business from that donation!  She loves her bag and wanted to get more to give as gifts.  Wahoo!  


Today I am going to work on an idea for a fused-glass wind chime to give to Eric's aunt and uncle back east, so I'll take pictures as I go.  I started attempting to cut up a Bombay Sapphire gin bottle yesterday to try to use some strips of it's beautiful light blue glass in a fusing project.  It wasn't as easy as I thought, but I did manage to get four sides....and a couple little cuts on my hand.  Oops!  


Friday, October 24, 2008

The Evolution of Fusing Copper in Glass, Staci Style

Because I love to knit as much as anything, I guess it was natural that I would end up knitting with copper wire and fusing that in glass.  I actually took a "Knitting with Wire" class a few years ago, so the knitting with wire idea wasn't something I just came up with out of the blue.  Here are my first experiments:


The piece on the left is a knitted swatch.  It's about 2.5"x4" and has white glass for the bottom layer.   The one on the right is a crocheted "granny square" and is all clear glass.  I discovered right away that using an opaque glass for the bottom layer really makes the wire show when  compared to using all clear glass.   

Here is a pendant that I made with a little swatch of knitting inside:


I love it!  I thought that the little knitted swatch bendant was great for knitters, but I decided that a crocheted flower would have wider appeal, so here are some examples of that:


I'm hoping to sell some of these on my etsy "store" when I get it up and running.

Around the time of this experimenting (early spring of 2007, I guess) I heard about a juried art show in Edmonds that would take submissions only from mothers called "Art of our Mothers".  It would take place around Mother's Day.  I decided that a fused class piece with different samples of knitting and crocheting would be the perfect thing to submit.  So I made up a bunch of copper wire swatches....


...and I fused them with different colors of glass as backgrounds.  I was partially inspired by the quilts made by women in my ancestry.  As I was working I was also feeling very grateful to my mom and paternal grandma for teaching my how to knit and crochet and wondering what they would think of me knitting and crocheting with copper wire!  I named the piece "Legacy".  Here is a picture of it: 


This piece is about 17" wide by 15" long.  A ton of trial and error went into making it, believe me!  I have rejects of several of the components hanging out in the garden.  I still haven't found a satisfactory way to hang it without having the method of hanging show.  It's not like a painting where the picture wire is hidden on the back.  I think I'll just have to get over worrying about that.
I owe a ton of thanks to my dad who helped me in the "eleventh hour" when my kiln went wacko and I still had pieces to fuse for this piece and the submission deadline was looming.  I was/am soooo lucky that: #1 - my dad is an electronics whiz, and #2 - we were able to find a replacement solenoid at the local Radio Shack.  This piece did hang in that 2007 Art of our Mothers show, and in the Arts of Kenmore show this summer.
Posted by Picasa

Thursday, October 23, 2008

Fused-Glass-with-Copper-Shapes Class Auction Project

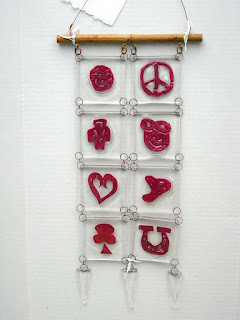
Here are pictures of the three fused glass & copper projects that my son's class made and donated to the school auction a couple of years ago.  There were 27 shapes/pieces, so I shuffled the individual pieces around (once they were all done with the fusing process) until we had 3 nice configurations -


Added together I think the pieces raised several hundred dollars, actually!

I have created some pieces of my own with the copper to give away as gifts.  Some of my favorites have been kanji symbols that I have cut out of the copper and fused into glass.  
This one says (roughly) "friendship" - 


I've also done the kanji symbols for "peace" and "love"....

Here is a Seattle-themed piece that I made for my dad's Lion's Club auction -


And finally, here is an example of an image that I've done a few different times to give to firefighter-types.  This one is a reject - I used too much glue to try to hold the copper flames flatter between the pieces of glass - 

The Beginning of My Fused Glass & Copper Experiments

Our elementary school was getting ready to hold it's PTA fundraising auction, and my son's class needed a unique auction item to create as a group to donate to the cause.  I had been wanting to try using the little kiln that I have to try some glass fusing, but I hadn't taken the plunge.  I knew a glass project for the auction would be cool and unique, but I didn't relish the thought of being in charge of a bunch of 5th and 6th graders messing around with glass shards.  I had been intrigued when I learned that copper could be fused into glass without any compatability problems.  So my idea was hatched - I needed to find some copper sheeting that the kids could cut symbols or shapes out of that I could then fuse into squares of glass.  At first I was thinking along the lines of making sets of coasters with the glass and copper, but then I ultimately decided that creating a few hanging pieces would be the ticket.

I bought some copper foil at a craft store, figuring it would be easy for kids to cut with scissors.  Actually, that copper foil is really hard to cut with scissors, just so you know.  I also tried making a shape out of fine copper wire, just for kicks.  Here's a picture of the foil piece before fusing.  You can barely see the wire-shape piece next to it:


Unfortunately the copper foil isn't pure copper, so it burned up a bit and looks gnarly:


But the wire one looks pretty good:


It reminds me of wire drawings that were part of the Vik Muniz exhibit at the Seattle Art Museum a couple of years ago.
Luckily the very helpful man at Seattle Stained Glass suggested that I visit onlinemetals.com in Fremont/Ballard and see if they had some appropriate copper sheeting.  Fortunately they had a roll of the perfect stuff.  So the project with the class was a go!
Posted by Picasa